VS Code Chat with AIProxy
VS Code Chat can connect to Serenity* Star's AIProxy agents through the OpenAI-compatible Responses endpoint. You can register an AIProxy agent as a custom model and then chat with it from the Chat view while you code.
This page explains how to add AIProxy as a custom model inside VS Code Chat. BYOK models work without a GitHub account or a Copilot plan, although some VS Code features, such as inline suggestions and semantic search, still require GitHub Copilot.
Prerequisites
- Visual Studio Code installed. Download VS Code
- VS Code Chat enabled. See AI language models in VS Code for information about using Chat and adding your own language models.
- A Serenity* Star API key (see API Keys). Important: The API Key needs the "Agent Execution" role.
- The agent code of the AIProxy agent you want to use, along with the Vendor and ModelId, in the
{agentCode}:{vendor}:{modelId}format, for examplemy-aiproxy-agent:OpenAI:gpt-5.6-luna. See themodelidentifier.
How it works
VS Code Chat's custom models live under the customendpoint vendor. Each model points at a full AIProxy URL (including the /responses path) and carries its own capabilities and limits. The configuration is stored in a chatLanguageModels.json file in your VS Code user profile. The command palette flow below creates the endpoint and opens that file for you to add your agents.
Configuration
- In VS Code, open the command palette (
Ctrl+Shift+P/Cmd+Shift+P) and runChat: Manage Language Models.

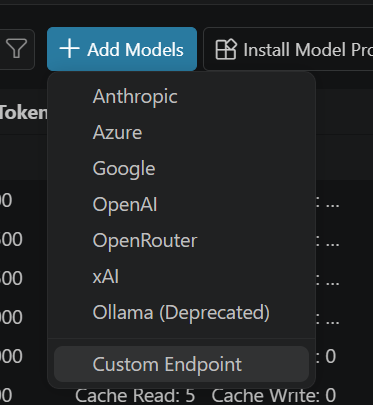
- Click Add Models and choose the Custom Endpoint option.
- When prompted for the group name, enter anything you like, for example
Serenity* Star. - When prompted for the API key, paste your Serenity* Star API key.
- When prompted for the API type, choose Responses.
- VS Code opens
chatLanguageModels.jsonso you can configure the models. Add your AIProxy agent using the example below, then save.
[
  {
    "name": "Serenity* Star",
    "vendor": "customendpoint",
    "apiKey": "${input:chat.lm.secret.aiproxy}",
    "apiType": "responses",
    "models": [
      {
        "id": "my-aiproxy-agent:OpenAI:gpt-5.6-luna",
				"name": "My AIProxy Agent - GPT-5.6 Luna",
        "url": "https://api.serenitystar.ai/api/v2/aiproxy/responses",
        "toolCalling": true,
        "maxInputTokens": 1050000,
        "maxOutputTokens": 128000,
        "apiType": "responses",
        "zeroDataRetentionEnabled": true
      }
    ]
  }
]
| Field | Notes |
|---|---|
vendor | Always customendpoint for an OpenAI-compatible endpoint. |
apiKey | Your Serenity API key. The ${input:...} form prompts for the value and stores it in VS Code's secret storage instead of in plain text. |
id | The AIProxy {agentCode}:{vendor}:{model} identifier. This is what selects the agent and routes to the model, so it must match exactly. |
name | A friendly display name shown in the model picker. |
url | The full AIProxy Responses endpoint, including the path: https://api.serenitystar.ai/api/v2/aiproxy/responses. |
apiType | responses, matching the endpoint in url. |
toolCalling | Set true if the routed model supports function calling. |
maxInputTokens, maxOutputTokens | Context and output limits for the routed model; adjust to the model you target. |
zeroDataRetentionEnabled | Required when using the Responses API. |
zeroDataRetentionEnabled: true for the Responses APIAIProxy does not persist conversation state server-side. With the Responses API, clients can otherwise reference a stored prior turn by its response ID, which AIProxy has no record of. Setting zeroDataRetentionEnabled: true tells VS Code to send the full conversation on every request rather than relying on server-side retention, so multi-turn chats work correctly.
Select the model
Once you save chatLanguageModels.json, open the Chat view, open the model picker above the chat input, and select your AIProxy model. Reload VS Code if it does not appear immediately.
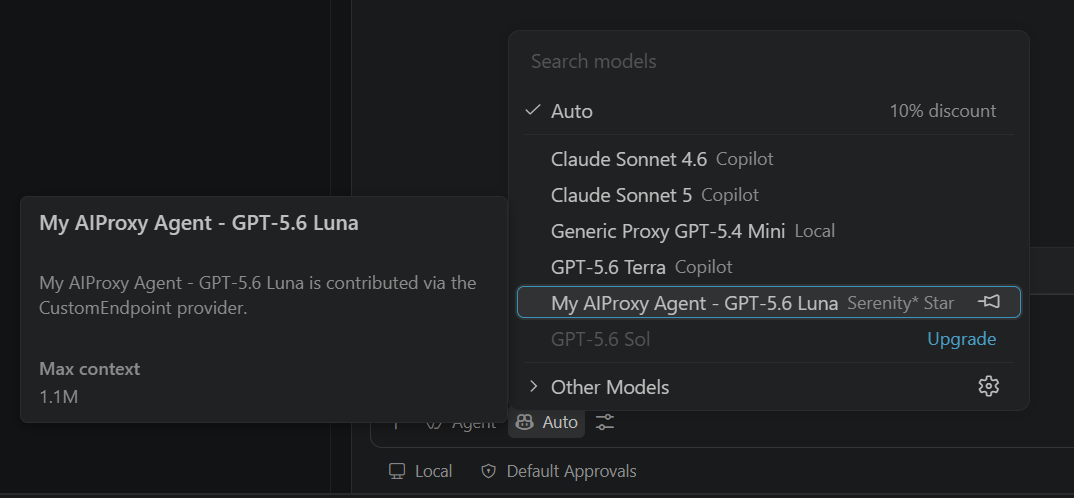
You can then type into the Chat input as usual. Your prompts will be answered by the AIProxy agent.